Tuesday, May 29, 2012

Wine Connoisseur or Wino!!!

This week's post will definitely be totally different than any of my other posts because there will not be any modifying of any recipes.  Sorry for all of you that wanted a new recipe....maybe I will double up next week.  We will see.  I recently went to Napa Valley and learned quite a bit about wine.  So in this post, I wanted to share what I learned and what foods pair well with certain types of wine.  Hope you enjoy!!!!


So to get to Napa, we went to San Francisco and drove to Napa.  The weekend that I happen to be there was the Golden Gate Bridge's Birthday.  Love the Golden Gate Bridge.  Since we were right there, I can't help but put Alcatraz in this post.  It's off in the distance.

So anyways, I digress....below are some pics and even a video that I took from Napa.  Sorry to overload you with pictures but it was just so beautiful.


While there, I visited 6 vineyards.  However, I only remembered to get pictures of a couple.  I was drinking tons of wine...what do you expect?!?!?

Hess had a really cool art musuem that accompanied the wine tasting.  It was absolutly amazaing and it was FREE to view the art.  What a deal!!!!


While most people know that pair white wine with chicken and fish or other white meats and red wine with beef, lamb and other red meats, one vineyard gave us popcorn with our wine.  It was actually pretty tasty.


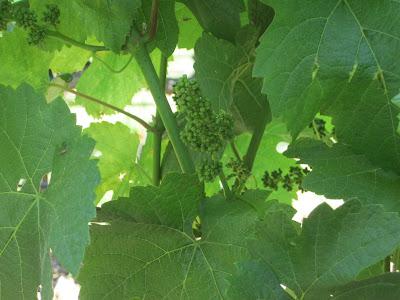
Overall it was a very imformative trip and I definitely plan to go again because harvest time is in the fall.  Right now the grapes are all growing and are very, very tiny.  They were almost unrecognizable.  See pics below..... Those are the baby grapes....aren't they cute!


Feel free to watch this small video of the view from one of the vineyards.  It was just as enjoyable as this video looks.

Tuesday, May 22, 2012

Taco Soup??? More like Chili If You Ask Me

Since I talked about turkey chili last week, I figured that I would also talk about my favorite chili recipe.  Though I make many changes, the base is still the same no matter where you find the recipe.  The technical term for this chili is "Taco Soup"; however, if you dare to make this at home...and I know you will....you will see that it is more like chili.  The recipe that I am modifying comes from Paula Deen.  Yes, butter loving, fat encouraging, Paula Deen.  Though some people have an issue with her style of cooking, I think that it is very flavorful and each person should use items, like butter, to their preference level.  Paula Deen is not to blame for America's issues with obesity.  Now that I've finally voiced my opinion about Paula Deen, we can move on.  Feel free to watch Paula make this dish using the link below and then take a look at the changes that I've made.  I think you will find that my changes make the recipe that much easier and also shows a different cooking method that can be done in 30 - 45 minutes. 

                               http://www.foodnetwork.com/videos/taco-soup/32064.html

Photo courtesy of http://southernfood.about.com/od/soupandstew/r/bl30414v.htm


Paula Deen’s Recipe 
Ingredients
  • 2 pounds ground beef
  • 2 cups diced onions
  • 2 (15 1/2-ounce) cans pinto beans
  • 1 (15 1/2-ounce) can pink kidney beans
  • 1 (15 1/4-ounce) can whole kernel corn, drained
  • 1 (14 1/2-ounce) can Mexican-style stewed tomatoes
  • 1 (14 1/2-ounce) can diced tomatoes
  • 1 (14 1/2-ounce) can tomatoes with chiles
  • 2 (4 1/2-ounce) cans diced green chiles
  • 1 (4.6-ounce) can black olives, drained and sliced, optional
  • 1/2 cup green olives, sliced, optional
  • 1 (1 1/4-ounce) package taco seasoning mix
  • 1 (1-ounce) package ranch salad dressing mix
  • Corn chips, for serving
  • Sour cream, for garnish
  • Grated cheese, for garnish
  • Chopped green onions, for garnish
  • Pickled jalapenos, for garnish
Directions:


Brown the ground beef and onions in a large skillet; drain the excess fat, then transfer the browned beef and onions to a large slow cooker or a stockpot. Add the beans, corn, tomatoes, green chiles, black olives, green olives, taco seasoning, and ranch dressing mix, and cook in a slow cooker on low for 6 to 8 hours or simmer over low heat for about 1 hour in a pot on the stove. To serve, place a few corn chips in each bowl and ladle soup over them. Top with sour cream, cheese, green onions and jalapenos.


Tracy’s Recipe
Ingredients

·         2 lbs ground beef

·         1 onion (chopped)

·         1 can pinto beans (15 oz)

·         1 can whole kernel corn, drained (11 – 15 oz)

·         1 can stewed tomatoes, Mexican style (14.5 oz)

·         1 can rotel tomatoes (or tomatoes with green chile peppers)

·         1 pkg of taco seasoning

·         1 pkg original hidden valley ranch dressing (dry)

·         1 can tomato sauce

·         1 can chili beans (mild or hot)
·         Cornbread

Directions:

Brown ground beef and onions, drain fat.  Add remaining ingredients and simmer for half hour to hour.
As you will see, the main differences between our recipes are the following:
  • less onions in my modification
  • no diced tomatoes as I don't really want a real "tomatoey" soup/chili
  • no green chiles as there are enough of them in the rotel
  • instead of pinto and kidney beans, I add pinto and chili beans
  • only added 2 cans of bean versus 3 cans...there is a such thing as to many beans :-)
  • added tomato sauce to make it more of a chili than a soup
  • paula made her using a slow cooker and mine was just done on the stove top...both work very well.
I hope you enjoy this soup/chili as much as I do.  It really is one of my favs!!!

Tuesday, May 15, 2012

Yes it's Chili...but it's a Summer Chili

So normally I write about recipes that I have tried and modified. Well not today.... Today, I want to share a recipe that a friend of mine gave me years ago that is very healthy and light and even though it's a chili, it's not just a winter chili. Actually, I would probably say that it is more of a spring/summer chili. (assuming that you can put a season on chili...LOL). Anyways, I wanted to pass this on to you so that you can enjoy it also.  It is also very flavorable and a 30 minute meal so no excuses that a good and healthy meal takes to much time.  For all of the busy men and women, this is one recipe that should definitely be a staple meal.

Below are the ingredients:
  • 1 lb Lean Ground Turkey
  • Chi-Chi's Medium Salsa
  • Fresh Gourmet Artichoke & Garlic Salsa
  • 1 Can of White Northern Beans
  • Shredded Monterrey or Pepper Jack Cheese
  • Tostitos


Recipe:
  • Brown Turkey and Drain Excess Fat
  • Add Chi-Chi's and Fresh Gourmet's Salsa
  • Rinse and Drain Beans and add to other ingredients
  • Simmer 15-20 minutes
  • Sprinkle Cheese on Top
  • Enjoy with Tostitos Scoops


Tuesday, May 8, 2012

Cake Pops??? Ummm No...Cake Disaster!!!

Cake Pops have become really popular recently and since I like anything new, I figured, why not try to make them myself.  Bad Idea!!!! How about I should have done a little bit more research before tackling cake pops....and by research I mean trial and error.  But no....I'm big and bad and confident in my ability to cook and try new recipes so I thought I had this in the bag.

A couple of blogs ago I wrote about a cook off that my cousin and I did for Easter.  I also talked about how I lost the cook off because of many failures.  Well...dessert was one of those failures.  I decided to do cake pops for dessert and unfortunately, EVERYTHING WENT WRONG! I want share my errors with you so that you don't repeat my mistakes. 

Ingredients:
1 box of cake mix (any flavor)
1 can of icing or other wet ingredient (such as whipping cream)
Lollipop sticks
Coating (chocolate, white chocolate, etc.)
Photo Courtesy of www.bakerella.com


Instructions:
1. Bake cake according to directions
2. Let cool and then crumble
3. Mix in icing or wet ingredient until crumbles stick together
4. Insert stick and put in freezer for at least 20 -30 minutes
5. Dip cake pop in melted chocolate
6. Decorate as desired

My Mistakes:
  • I did not put my cake balls set in the freezer; I thought that putting them in the refrigerator longer would be an even substitute.
  • I did not put enough of the wet binder when rolling the balls
  • I used almond bark which is heavier than candy melts
  • I melted my almond bark in the microwave and should have used a double broiler (thinner coating that is not too heavy)
So what happened:
  • When I tried to dip my cake pops in the chocolate and pull them out, the stick came out
  • Because I melted my chocolate in the microwave it seized up and became really thick
  • My cake pop crumbled when I tried to insert the stick because I did not use enough of the whipping cream to bind the pop together.  In addition, not allowing it freeze and set up also made it crumble.
Photo Courtesy of www.bakerella.com

Needless to say....my first attempt was a major FAILURE!!! and looked nothing like the picture to the left.  Luckily for me, I have friends in high places.  You Tube...LOL.  Below is a video on the correct way to make cake pops courtesy of Bakerella.  In addition, she has a Cake Pop Recipe Book that I have had the privilege to flip through and it is AMAZING.  My copy is on it's way soon.


Please take a look at the video to the right to learn all that you need to know about Cake Pops.  Hopefully, you have better success than I did.

Tuesday, May 1, 2012

More Flavor, Please!!!!

I consider myself to be a lover of all starches..mainly french fries and bread.  However, bread is one of my most absolutely favorite things to eat...garlic bread, cheesy bread, croutons, etc. So when I found this recipe, I couldn't be more excited.  Pizza bread...YAY!!!


After doing  a little bit of research I learned that there were other names for it, like Pizza Monkey Bread.  The recipe below is one of the first recipes that I personally pinned on Pinterest and, as usual, I made some changes (with the help of a friend).  Those changes are what I want to share with you.  The original recipe is as follows.


Ingredients

  • 2 cloves garlic, thinly sliced
  • 4 Tbsp butter
  • 2 lbs pizza dough (I used this recipe because it makes enough for two pizza)
  • 6 oz mozzarella cheese, cut into small cubes (you'll need ~48 pieces)
  • 48 slices of Turkey pepperoni (from 1 package)
  • 2-3 cups marinara sauce, warmed, for serving

Instructions

  1. Heat garlic and butter over medium heat just until the garlic begins to brown. Remove from heat and let sit.
  2. Lightly brush the inside of a bundt pan (or other oven-safe dish) with garlic butter.
  3. Pull off large marble-sized balls of dough and flatten (~2/3 of an ounce, a kitchen scale makes this very easy). Top with a slice of pepperoni and a cube of mozzarella    
  4. Wrap the dough around the pepperoni and cheese, pinching well to seal.
  5. Very lightly brush the pizza ball with garlic butter and place into the bundt pan (I dabbed the     pizza balls on a butter-dipped silicon brush to keep butter use low - there will be 1+ Tbsp leftover - and my hands butter free. Buttery hands make it hard to get the pizza balls to seal).
  6. Repeat until all of the dough is used.
  7. Cover and let sit for 30 minutes, while preheating the oven to 400.
  8. Bake for ~35 minutes, until the top is very brown.
  9. Remove from the oven and let sit for 10 minutes.
  10. Turn out onto a platter and serve with warmed marinara sauce for dipping.


My Issues and Recommended Solutions:
  • Not much flavor/seasoning.  So here is what I add to the garlic butter:
    • 1 tsp oregano
    • 1/2 tsp garlic powder
    • 1/2 tsp onion powder
    • 1/2 tsp black pepper
    • 1/4 tsp red pepper flakes
    • 2 tbsp parmesan cheese sprinkled on top before baking
  • The pepperoni easily breaks through the dough so the solution is to either cut the pepperoni into quarters or use mini pepperoni.
  • Shredded mozzarella cheese works as a substitute for the cubed mozzarella.
  • Non-stick cooking spray can be used on the pan instead of brushing the garlic butter on the inside of the pan.
Hope you try my recommendations one day soon!!!!


Recipe and Photos courtesy of http://www.jasonandshawnda.com/foodiebride/archives/7195

Tuesday, April 24, 2012

Luckily for Me...I Knew to Modify

I discovered Pinterest a little while ago and have been addicted ever since.  What I enjoy the most are all the different recipes.  I have tried several of them and been very pleased with the ease of making them and also the final product.  However, there was 1 recipe that I tried that I did not agree with the amount of ingredients.  If I did not know how to cook and this was the first time that I tried the recipe, the end result would not have been good.  I found this recipe for 7UP Biscuits on Pinterest from http://www.plainchicken.com/2010/04/7up-biscuits.html (pictures as well).  Mine were not worth sharing...LOL.

This was one recipe that I could not wait to try.  At the time, Easter was quickly approaching and I wanted to use these in the cook off that we were having for Easter.  One of my cousins, who has been in the Food Industry for years, challenged me to a cook off.  Since I love to cook, I was very happy and couldn't wait.  I had so many recipes in my head that I wanted to try, namely these biscuits.  So I went grocery shopping, made sure that I had all the ingredients and on Easter Sunday, I went to work!!!


It was simple enough, right?


  • 2 Cups of Bisquick
  • 1/2 Cup of Sour Cream
  • 1/2 Cup of 7UP
  • 1/4 Cup of Melted Butter

Pour the melted butter in the bottom of the pan and mix the other 3 ingredients.

WRONG!!!!! What the recipe doesn't tell you is the following:
  • You will definitely need more than 2 cups of Bisquick to add in 1/4 cup increments until the dough is not too sticky to handle.
  • If you want fluffy, thick biscuits, DO NOT roll your dough to thin.  Roll it to the thickness that would allow you to cut out 9 biscuits only.  If you can cut out more than 9, then your dough is too thin.  If you cannot cut out 9, then your dough is too thick.
  • You will need extra Bisquick to shake onto your rolling pin and to put on the counter so that the dough doesn't stick to the counter.

I'm sure you're curious to know how my biscuits turned out...right?  Well they were very delicious and definitely a show stopper, BUT... they were a little flat.  I made two batches of the above recipe and rolled the dough thin enough to get 12 biscuits per batch.  Despite this faux pas of having flat biscuits....EVERYONE loved them.  In regards to the cook off...I lost (only winning the meat category).  I had some other issues not related to screwed up recipes.  I'll save that for another post.  This is how they should look!!!!

Tuesday, April 17, 2012

Why Food??? Why Not?

I know you're probably thinking "Does the world really need another Food Blog?".  The answer: Yes!...Because this blog is not like the other ones.  Don't worry, I'm not going to bore you with never ending posts of recipes.  Because we all know that you can just search Google for that.  What I plan to do is take recipes that I've tried and show you how I changed them.  Some recipes are just written poorly and if followed correctly will NOT get you the desired outcome.  Other recipes are just too time consuming and need a little bit of tweaking.  In either case, I think it's more interesting to get the real scoop on what really works and what does not.  This is definitely more fun that just copying and pasting a recipe, right????

Just to give you some more background on me....I've always had this desire to cook.  It's like I was born with cooking already engrained in my brain of "Things I Love".  My mother tells me stories of when I was younger and while I was not tall enough to see over the counter, I always wanted to help her cook.  She said that she would let me stand on a chair and peel the potatoes and sweet potatoes.  See, I come from a family with Grandmother's that could really, really cook.  My maternal grandmother is still living but does not cook like she used to due to her age and illnesses.  However, everybody knows that my Grandmother could "Throw Down" in the kitchen.  I have so much admiration and respect for my Grandmother because of her skill in the kitchen.  In the near future, I plan to sit down with her and put some of her recipes on paper.  No matter the number of academic degrees I obtain, I feel that being a great cook is at the top of my list of accomplishments.  Being able to reach people through food is very important to me.  I strive to have the kind of impact during my lifetime that my Grandmother has on me.  She is truly something special.